Google and their services heavily rely on ad revenue, and there is no way to get rid of them completely. Something equally annoying as the ads are the notification prompts we receive on Google Chrome. You would agree with it as you might also be receiving it, from the websites you visited sometime ago. Lucky for us, Google Chrome do let us effectively manage these prompts. So in this guide, we’ll look at how to stop webpage notification prompts in Chrome.

Related: How to Block Websites on Chrome
As said earlier, Google Chrome let us manage notification prompts. You could take it slow by disabling websites one by, or you could disable them all at once. And if you really need you could set exceptions. So let’s have a look at how this can be done. But before we proceed, make sure you’re running the latest version of Chrome, just for the sake of this guide.
Stop Webpage Notification Prompts in Chrome
Blocking notifications one by one is easy. All you need to do is click on block whenever a website asks you permission in the first place. But let’s have a look at how we can manage them like a pro. To do that.
- Open Google Chrome.
- Click on the menu icon (3 dots) at the top-right corner of the browser.
- Go to Settings > Privacy and Security and click on Site Settings.
- Scroll down and click on Notifications.
- You could also bypass steps 1-4 by typing in the following address onto the Chrome search bar.
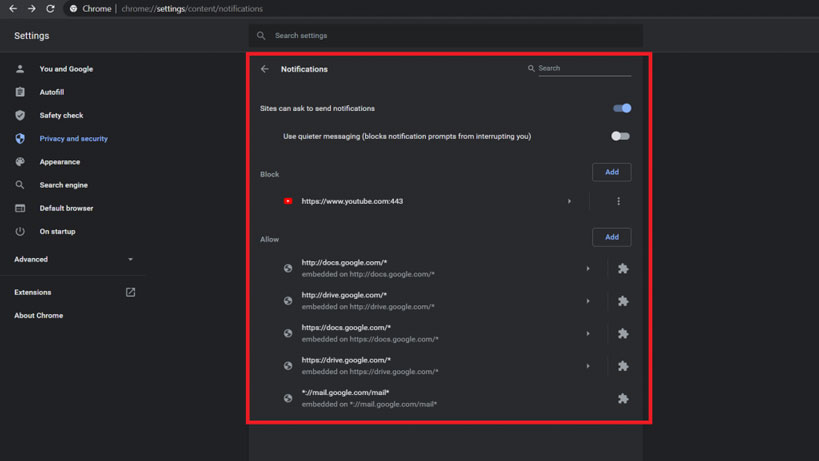
chrome://settings/content/notifications

- From the currently open window, you can manage the notifications the way you seem fit. You can do the following.
-
- Click on Sites can ask to send notifications to turn on/off those annoying prompts. You could also click on Use quieter messaging to receive those notifications quietly.
- Block websites by clicking on the Add button under the Block section. You can also click on the arrow to the right of the blocked websites to manage them.
- Add websites by clicking on the Add button under the Allow section. You could also manage each website by clicking on the arrow at the right end of each website.
Must See: Chrome OS 90 now gets Live Captions and more in the new update
That’s it. You’re now a pro at managing notifications on Google Chrome. If you haven’t noticed it yet, you now have more control over the web pages using this method. We hope you found this guide helpful. Do let us through the comments if you need any further information.
