Here is a neat little guide on how to change your cursor on Chromebook. If you have a knack for customization then surely you would customize your device to the last detail. While changing the cursor may sound old school but for clarity purposes having a distinct cursor can be useful.

There are two ways to change your cursor on Chromebook. You can use the Chrome OS settings to change the aspects of the Chromebook cursor. Apart from that, you can use a third-party Chrome browser extension to customize the cursor on your Chromebook.
Related | How to Use Instagram on Chromebook?
Change Your Cursor on Chromebook?
First, let us check out how to change the cursor of the Chromebook using the native Chrome OS settings.
Change Cursor from Chrome OS Settings
- Launch the Settings app on your Chromebook.
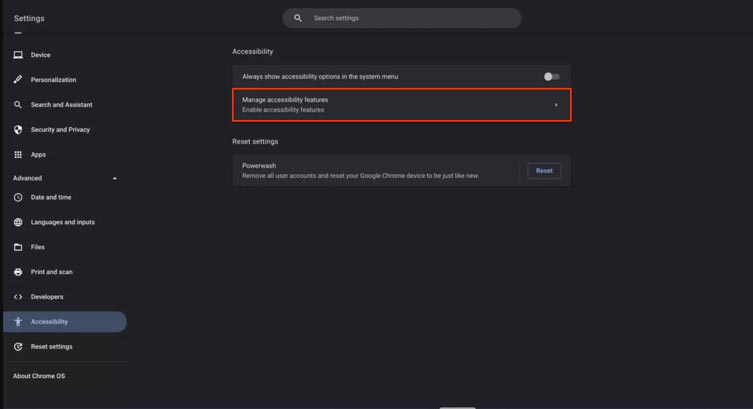
- In the left navigation panel click on Advanced > Accessibility.
- On the right-hand side, click on Manage accessibility settings.

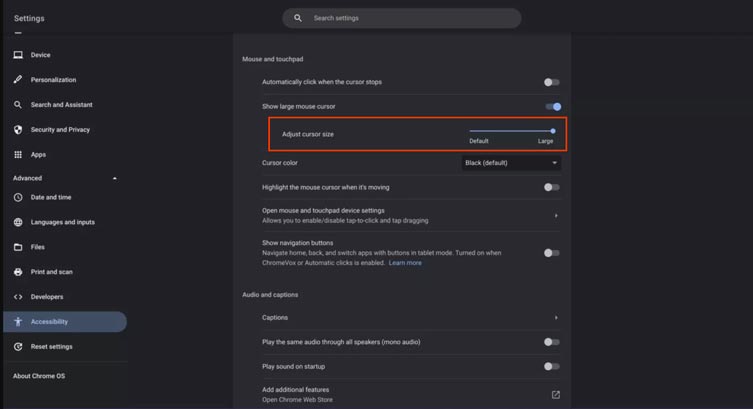
- Navigate to Mouse and touchpad and click on it.
- If you want to change the cursor color, click the dropdown menu beside the Cursor color and select the color of your choice.
Changing the Size of the Cursor
- Go to the Settings app of the Chromebook.
- In the left-hand panel click on Advanced > Accessibility.
- On the next page, click on Manage accessibility settings.
- Go to Mouse and touchpad and click on it.
- Click the switch next to the option Show large mouse cursor.

- A slider named Adjust cursor size will show up.
- Click and move the slider to tweak the size of your Chromebook cursor.
Along with the above customization, you can also enable highlight the cursor, and enable auto-click when the cursor stops. These are all customizations you would need to personalize your cursor on a Chromebook.
How to make Custom Cursor on Chromebook?
If you want to explore deeper scopes of customizing the cursor on the Chromebook, you can use the dedicated Chrome extension for that.

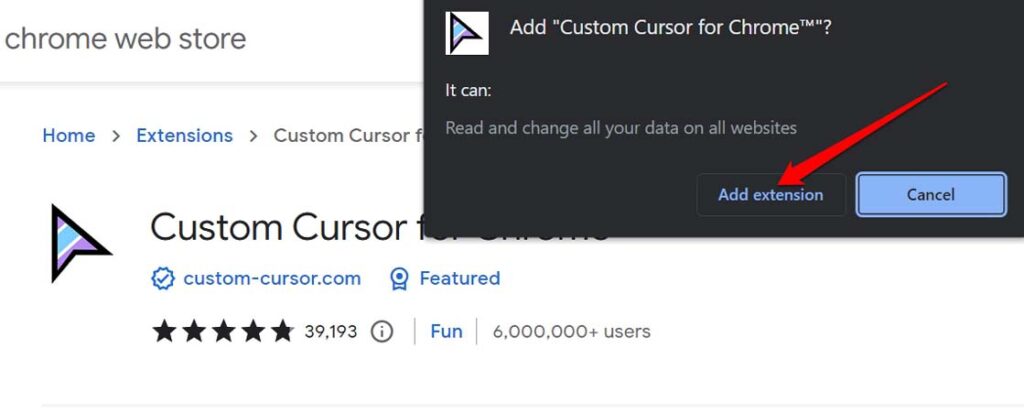
- On the Chrome web store search for Custom Cursor for Chrome.
- Click on Add to Chrome.

- When the pop-up appears, click on Add extension.

- Once installed you will see a new extension on the Google Chrome address bar. It will have a cursor icon. Click it to open. [You may also find it in the Extensions section]
- Select one of the available cursors or click on More cursors to navigate through the entire collection of custom cursors.
Use the cursor size button to make changes to the dimensions of the cursor as per your need. To enable the default cursor of the Chromebook click on the Power button.
Related | Best Monitors for Chromebooks 2022
You can also change the size of the custom cursor using the cursor size button at the top of the extension, and return to the default cursor by clicking the power button at the top of the extension. If you like using custom cursors for fun and want to change your cursor on Chromebook, give these two methods a try.
