
Chromecast with Google TV is one of the most popular streaming devices in the market. Even being one of the most innovative TV gadgets, it still comes with most flaws you find in a Smart TV. One such drawback of the Chromecast with Google TV is the lack of sufficient onboard storage. Lucky for us, this shortage in storage can now be resolved. So let’s see how to expand the storage on a Chromecast with Google TV.

Related: How to play Amazon Music on Google Home devices
Even though we said you can expand the storage on your Chromecast with Google TV, know that it will cost you. Now, based on where you live, this can be too low or too high. Our only choice here is to use a USB-C hub to connect external storage to the Chromecast. But that hub can be used for more than just extending your storage.
Pre-requisites
- Chromecast with Google TV.
- You can use the power adaptor of the Chromecast with Google TV. However, we highly recommend a power adaptor with the same voltage rating and a higher power rating. This way you can power multiple devices connected to the USB hub.
- A USB/SSD/HDD that uses the FAT32 file system.
- Make sure to buy a USB-C hub capable of powering the Chromecast with Googe TV. Ethernet ports and multiple USB ports are preferred for extended connectivity and functionalities. You can also see our best USB-C Hub for Google Chromecast with Google TV article.
Expand Storage on Chromecast with Google TV
There are two different ways of expanding storage on the Chromecast with Google TV. You can either use it as external storage or configure it to use actual extended storage for your Chromecast with Google TV. The second will let you install apps onto the storage device. And the Chromecast will consider it as internal storage. However, it should be noted that the second method involves a certain degree of risk. There is a high probability for the attached storage to get corrupted on a power failure.
Use as Secondary Storage
This method only requires you to set up the hardware. The rest is easy compared to the next. Follow these given steps to set up the hardware.
- Connect the USB hub to your Chromecast with Google TV using the USB-C cable attached to the hub.
- Connect the Chromecast with Google TV to the TV.
- Plug the power adaptor into the hub and turn on the power. If the device works as advertised, the Chromecast should turn on.
- Connect the external storage to any USB port of the USB hub, and the Chromecast should hopefully pick it up. Go to Settings > System > Storage to see attached storage devices.
You can now use Android video players like the VLC media player to stream media saved in the attached drive. Also, feel free to use any file manager to view the contents of the external drive.
Expand the Storage
If you’re someone who heavily relies on offline downloads, the 4 gigs of the Chromecast with Google TV might not be sufficient for you. Your best is to expand the storage on the Chromecast with Google TV. We highly recommend that you use a faster drive that won’t stall the device. Setting up the hardware is the same as we said above. Follow these given to set up a drive as device storage on the Chromecast with Google TV.
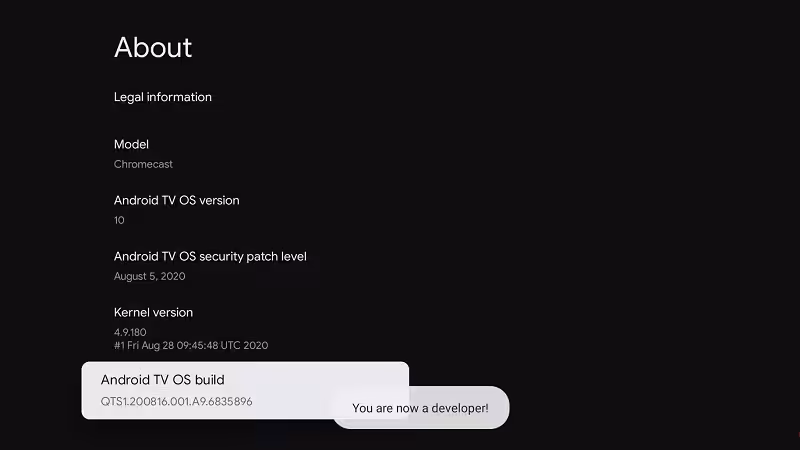
Before we proceed further, we’ll have to enable the Developer options on the Chromecast with Google TV. Go to Settings > System > About and tap on Android TV OS build 7 times to turn on developer options. Once it’s enabled, we can proceed with the setup.
Use a Drive as Device Storage
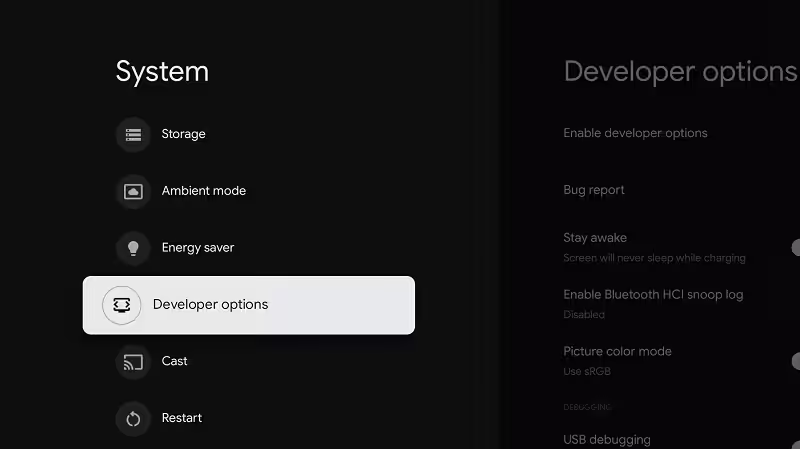
- Go to Settings > System > Developer options,
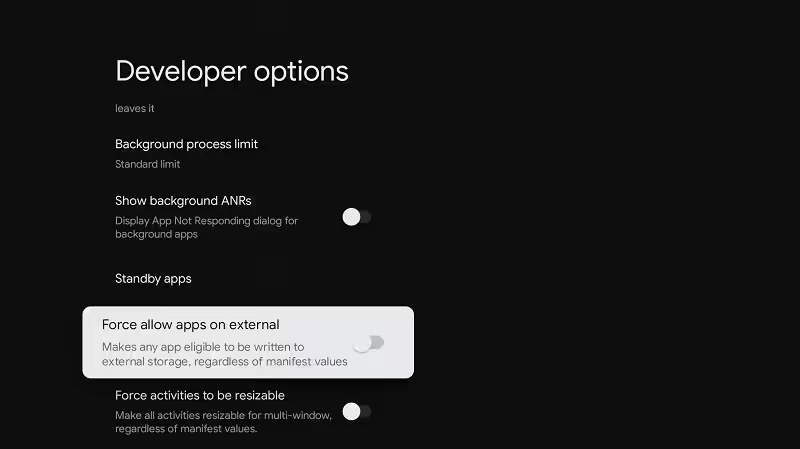
- Scroll down and look for Force allow apps on external. Enable the feature.
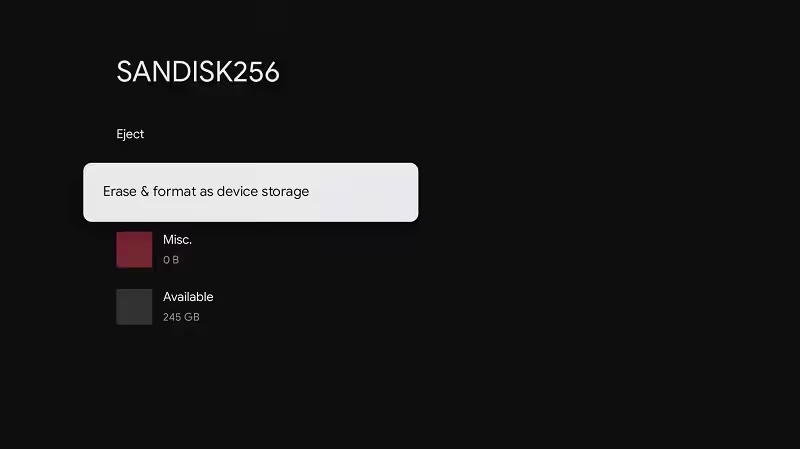
- Now go to Settings > System > Storage and select the drive you wish to use as device storage.
- Click on Erase & format as device storage.
- Confirm the action by clicking on the Format button in the next window.
- This will take some time, depending on the speed and capacity of the drive.
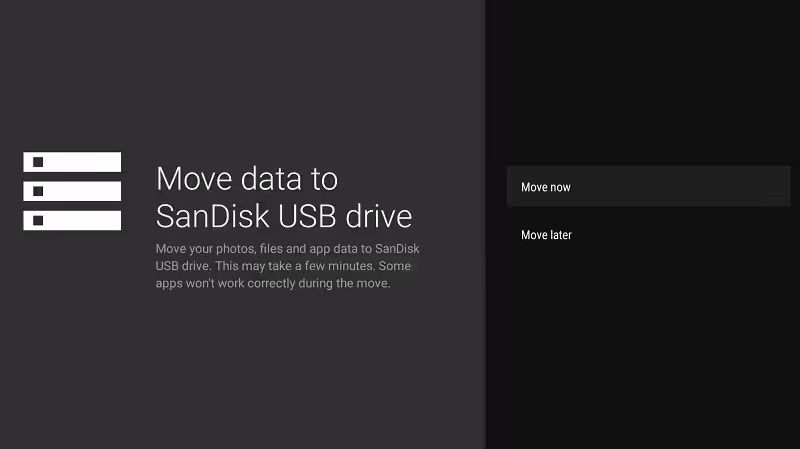
- You’ll be asked to move your data to the storage device when the format process is complete. Click on Move now or Move later as per your choice.
You can now move apps to the newly added storage by following these steps.
- Go to Settings > Apps > See all apps.
- Select the app you wish to move and click on Storage used.
- Change it to the newly added drive.
Also Read: How To Cast 7plus to Chromecast
The fun doesn’t stop there. The ethernet port on the USB hub can be used to connect the Chromecast to a wired network. Because wired networks tend to be more reliable than Wi-Fi. Other devices like mice and keyboards can be connected to the Chromecast using the USB hub. This way, you can sideload apps and use these devices to surf the net or do many things you do on a PC/Laptop.
Would it be possible to use a microSD/TF card to expand the memory or a thumb drive instead of a full blown HDD?
do you leave developer settings on? if you turn off what happens?
We recommend you keep it turned on. Nothing wrong could happen by doing so. Even though the name might sound scary to some of you, the Developer Mode won’t cause any harm to the device.
Are you able to recommend an USB hub that will work? I’ve checked with a couple of local Electronic stores, and all you get are blank stares.
Hey you can check out our article best USB-C Hub for Google Chromecast with Google TV.
FAT32 is a complete deal breaker, one cannot attach 4K content (movie) drive, let alone a proper Dolby Vision and Atmos, wich goes to 45 GB atleast, any way to overcome this?
This not going to work. The CCwGTV will still ignore the external storage and will not populate it for other software to use. So you not gonna be able to transfer files to that storage too. Unfortunately.
With a Fire TV 4K (and 4K Max) the external USB drive can be formatted as MIXED storage. The only information I have found for CCwGTV appears to be for older versions. My CC is Android TV OS version 12 with security patch level April 1, 2023. Can someone point me to better instructions for the current version?